Blog
How to configure site-to-site VPN with local FortiGate to Azure VM

By Elias Georgiou - Team Leader Implementation Services
FortiGate are next generation network firewalls manufactured from Fortinet that provide security for your network and unmatched threat protection for businesses of any kind or size. FortiGate is suitable small networks and can support up to hyperscale datacenters and are ideal for hybrid environments as well. FortiGate can be hardware, virtual and as we will see below a combination of both.
The following guide will provide a sample configuration scenario for a site to site VPN connection with a local FortiGate to an Azure FortiGate using IPsec VPN with static routing.
The following image shows the sample topology for this configuration:
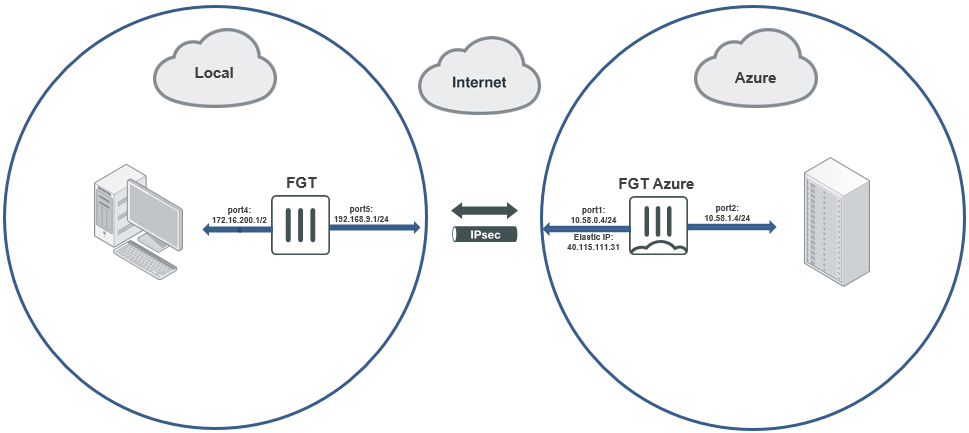
As per the above diagram the topology is consisted of a local FortiGate in a local environment with port5 configured as WAN and port 4 as LAN and a FortiGate located in Azure with port1 connected to WAN and port 2 connected to LAN.
The configuration guide using the GUI is consisted of the below steps:
- Configure the local FortiGate:
- Configure the interfaces.
- Configure a static route to connect to the Internet.
- Configure IPsec VPN.
- Configure the Azure FortiGate:
- Configure the interface.
- Configure IPsec VPN.
- Bring up the VPN tunnel on the local FortiGate.
- Verify the VPN tunnel on both the local FortiGate and the Azure FortiGate.
Configure the local FortiGate
To configure the interfaces:
- In FortiOS on the local FortiGate, go to Network > Interfaces.
- Edit port5. Set the role to WAN and set an IP/Network Mask of 192.168.5.1/255.255.255.0. This is for the interface connected to the Internet.
- Edit port4. Set the role to LAN and set an IP/Network Mask of 172.16.200.1/255.255.255.0. This is for the interface connected to the local subnet.
To configure a static route to connect to the Internet:
- Go to Network > Static Routes.
- Click Create New.
- Set the Destination to 0.0.0.0/0.0.0.0.
- For the Interface, select port5.
- Set the Gateway Address to 192.168.9.254.
To configure IPsec VPN:
- Go to VPN > IPsec Wizard.
- Configure VPN Setup:
- Enter the desired VPN name. In the example, this is "to_cloud".
- For Template Type, select Site to Site.
- For the Remote Device Type, select FortiGate.
- For NAT Configuration, select This site is behind NAT. For non dial-up situations where your local FortiGate has a public external IP address, you must choose No NAT between sites.
- Click Next.
- Configure Authentication:
- For Remote Device, select IP Address.
- Enter an IP address of 40.115.111.31, which is the Azure FortiGate's port1 public IP address.
- For Outgoing Interface, select port5.
- Set the Authentication Method to Pre-shared Key.
- Enter a pre-shared key of 123456.
- Click Next.
- Configure Policy & Routing:
- For Local Interface, select port4.
- FortiOS automatically populates Local Subnets with 172.16.200.0/24.
- Set the Remote Subnets to 10.58.1.0/24, which is the Azure FortiGate's port2 subnet.
- For Internet Access, select None.
- Click Create.
Configuring the Azure FortiGate
To configure the interface:
- In FortiOS on the Azure FortiGate, go to Network > Interfaces.
- Edit port2. Set the role to LAN and set an IP/Network Mask of 10.58.1.4/255.255.255.0. This is for the interface connected to the Azure local subnet.
To configure IPsec VPN:
- Go to VPN > IPsec Wizard.
- Configure VPN Setup:
- Enter the desired VPN name. In the example, this is "to_local".
- For Template Type, select Site to Site.
- For the Remote Device Type, select FortiGate.
- For NAT Configuration, select This site is behind NAT. For non dial-up situations where your local FortiGate has a public external IP address, you must choose No NAT between sites.
- Click Next.
- Configure Authentication:
- For Incoming Interface, select port1.
- Set the Authentication Method to Pre-shared Key.
- Enter a pre-shared key of 123456.
- Click Next.
- Configure Policy & Routing:
- For Local Interface, select port2.
- FortiOS automatically populates Local Subnets with 10.58.1.0/24.
- Set the Remote Subnets to 172.16.200.0/24, which is the local FortiGate's port4 subnet.
- For Internet Access, select None.
- Click Create.
To bring up the VPN tunnel on the local FortiGate:
The tunnel is down until you initiate connection from the local FortiGate.
- In FortiOS on the local FortiGate, go to Monitor > IPsec Monitor.
- Click the to_cloud tunnel.
- Click Bring Up to bring up the VPN tunnel.
To verify the VPN tunnel on both the local FortiGate and the Azure FortiGate:
In FortiOS on the local FortiGate, go to Monitor > IPsec Monitor. It should look like the following:

In FortiOS on the Azure FortiGate, go to Monitor > IPsec Monitor. It should look like the following:

 |
Elias Georgiou has been working for IBSCY for the last 6 years. He is the Team Leader in the implementations department which consists of 4 people. His team is fully responsible for the implementations of new and existing clients in Cyprus and internationally. He holds several certifications from Microsoft, HPE, VMWare, Fortinet, and other vendors. |
